Knitting Patterns

Tuesday, July 3, 2012

Fleece Dyeing


I am dyeing some wool fleece in 1 lb lots (18 lbs total, this round) for a rugmaker in west Texas. This is my first time to do fleece, & it has been an adventure! The requested colors are very pale baby blue, periwinkle, & steel gray-blue. 


I am finding that it's easier to get a dark, saturated dyelot than a pale one! 


The process involves several steps:

1. Soak the fleece, in net bags, 1 lb. each, in the washer. This is usually an all-day or overnight process.


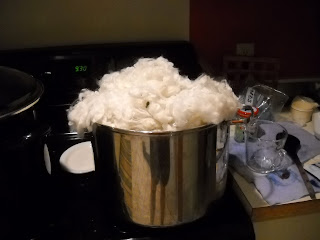
2. Place damp/wet fleece in a large stock pot with acid dye. In order to get very pale, I am using .5 grams of acid dye for 1 lb of fiber. Half a gram of acid dye is a tiny amount! Here it is weighed out on my triple beam balance scale.


Here is the fiber starting to "strike," or take on the dye color.


After the fiber has completely absorbed the dye, & the water has cooled enough to handle the pot, I take the pot outside & dump the fleece into a large tulle netting bag that I constructed for this purpose. The bags are suspended from the magnolia tree in my front yard. This is one of the blessings of fiber dyeing in Texas: It's soooo HOT that fiber can dry relatively quickly.


But overall, wet fleece is like a giant sponge & water must be pressed out of the bag every few hours. 


After a few hours minimum, I dump the fleece into a rigged up drying rack for more solar-aided drying.


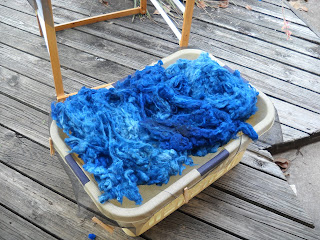
The fleece you see here is quite dark, darker than the speced samples that the customer requested. But you can see the process, anyway!


Here are the finished, dry fleeces in their bags ready for the rugmaker. The dye doesn't take very evenly, but it will all even out in the combing & wrapping process. 


I constructed/created tools out of yards of nylon tulle & also a roll of screening from Home Depot, a drying rack contributed by my friend George (who got it at a garage sale), a large laundry basket, two large stockpots. I also use wooden spoons, a gallon container for adding water to the dyebath, my triple-beam balance scale, & so on. Also, I am assisted by the 100+ F days here in Texas, because wet fleece doesn't voluntarily give up its water! 


It's really fun overall, & it's lovely to see things turn beautiful colors. 

Monday, April 4, 2011

Mitered Square Cap


Mitered Square Cap


From Topflappen Hat by Charlene Schurch, in Hats On!! 31 Warm and Winsome Caps for Knitters, published by Down East Books, 1999. Schurch gives credit to Horst Schultz, Das Neue Stricken Kindermode.

Size: Adult large, circumference 19.5”.

Gauge: each square measured on the diagonal: 3.25”.

Needles: U.S. size 6 or 7, check gauge to be sure.

By Jennifer Thompson Miller, M.A.

One Color Half Squares (downward pointing triangles):

Row 1. Using knit cast-on, c/o 23 st.

Row 2. RS – s1, k2 tog tbl, k7, s1 k2tog psso, k9, p1. 20 st.

Row 3. WS - s1, k2 tog tbl, k to last stitch, p1. 19 st.

Row 4. s1, k2 tog tbl, k5, s1 k2tog psso, k7, p1. 16 st.

Row 5. s1, p2tog, p to end. 15 st.

Row 6. s1, k2 tog tbl, k3, k to last stitch, p1. 12 st.

Row 7. s1, k2 tog tbl, k to last stitch, p1. 11 st.

Row 8. s1, k2 tog tbl, k1, s1 k2tog psso, k3, p1. 8 st.

Row 9. s1, p2tog, p to end. 7 st.

Row 10. s1, k1, s1 k2tog psso, k2 tog, p1 – 5 st.

Row 11. Bind off.

Two Color Half Square (downward pointing triangles):

Row 1. MC. Using knit cast-on, c/o 23 st.

Row 2 (RS). k1, k2 tog tbl, k7, s1 k2tog psso, k9, p1

Row 3 (WS). s1, k2 tog tbl, k to last stitch, p1

Row 4. CC - s1, k2 tog tbl, k5, s1 k2tog psso, k7, p1

Row 5. s1, p2tog, p to end. – 15 st

Row 6. MC - s1, k2 tog tbl, s1 k2tog psso, k to last stitch, p1

Row 7. s1, k2 tog tbl, k to last stitch, p1

Row 8. CC - s1, k2 tog tbl, k1, s1 k2tog psso, k3, p1

Row 9. s1, p2tog, p to end. 7 st.

Row 10. MC - s1, k1, s1 k2tog psso, k1, p1 – 5 st.

Row 11. Bind off.

Two Color Full Square –

Picking up stitches from existing squares

Row 1. MC. Pick up 23 stitches: 11 from the right-hand square, 11 from the left-hand square, 1 from each triangle where they join.

Row 2 (RS). K10, s1 k2tog psso, k9, p1

Row 3 (WS). s1, k to last stitch, p1

Row 4. CC. s1, k8, s1 k2tog psso, k8, p1

Row 5. s1, p to end

Row 6. MC s1, k7, s1 k2tog psso, k7, p1

Row 7. s1, k to last stitch, p1

Continue working these two colors until 3 stitches remain.

Last WS row: s1, k1, p1

Last RS row: s1 k2tog psso, do not bind off last stitch – use this stitch for next square.

Abbreviations

Sl1– slip one stitch as if to purl with yarn in back

k2 tog tbl – knit 2 together through the black loop

s1 k2tog psso – slip one, knit 2 together, pass slipped stitch over the knit stitch

p3tog – purl 3 together

MC – Main Color

CC – Contrast Color.

RS - Right Side

WS – Wrong Side

Construction of Cap

Begin by making 6 half squares. Place 2 half-squares with their points up. Pick up and knit 11 st from each half-square and 1 st from the places where these two half-squares join. Work a full square. Repeat this process until you get to square #6, which will close the circle of the squares.
Continue working 2 more rows of squares as shown in the diagram. After you have completed square 18, work 6 more half-squares around the top of the cap.


Cuff
Round 1: Using MC and dp needles (or a 16"
circular needle), pick up and knit 78 stitches
along the edge of the half squares that you
have just finished (13 st across the long side of
each half square).
Round 2: purl
Round 3 and 4: K, using CC
Round 5: k MC
Round 6: p MC
Rounds 7 and 8: K, using CC
Round 9: k MC
Round 10: p MC
Bind off in MC.


Top of cap
Round 1: Using MC and dp needles (or a 16"
circular needle),beginning at the center of one
of the half squares, pick up and knit 90 stitches
(15 st across the long side of each half square).
Switch to dp needles as stitches decrease.
Round 2: MC. *p6, p3tog, p6*, repeat around.
Round 3: CC. Knit.
Round 4: CC. *k5, s l k2tog psso, k5*, repeat
around.
Round 5: MC. Knit.
Round 6: MC. *p4, p3tog, p4*, repeat around.
Round 7. CC. Knit.
Round 8. CC. *k3, s l k2tog psso, k3*, repeat
around.
Round 9. MC. Knit.
Round 10. MC. *p2, p3tog, p2*, repeat around.
Round 11. CC. Knit.
Round 12. CC. *kl, s l k2tog psso, kl*, repeat
around.
Round 13. MC. Knit.
Round 14. MC. *sl k2tog psso*, repeat around.
Break off yarn with an 8" tail and thread the
end into a yarn needle. Draw the thread
through remaining stitches and fasten off.


I am not sure why the chart is not showing up clearly. Stay tuned, I am working on it. Meanwhile, double click on the chart & it will appear big enough to print/follow.


Please post any comments or feedback! I appreciate all of you!
Jennifer@dizzylettuce.com
Dizzylettuce on Ravelry


Tuesday, February 1, 2011

Mitten Recipe! Free Pattern!


Basic Mitten Recipe

You can use this pattern for any weight yarn and any size needles. I suggest that you consider slightly smaller needles than you would normally use for your yarn in order to create a dense, warm mitten fabric! This pattern does not require changes for handedness – the mitt will work for either hand.

Needle Size

Cast On

Thumb Increases

Yarn Weight

4

44

14-16

Dk, sport, sock (held double)

6-7

40

12-14

Worsted

8

32

12-14

Worsted, Aran

9

28

10

Bulky

10.5

24

8

Bulky

Size

Adult woman medium-large.

Materials

4 oz yarn (approx)

Double-point needles, stitch markers, safety pin, tapestry needle

Pattern Notes

If you are going to start out with a k2p2 rib, you will need to cast on a multiple of 4 stitches. If you want to increase the mitten size, increase by multiples of 4 st. A k1p1 rib requires a multiple of 2.

Make 1 (M1)

There are many methods of M1. My favorites are:

1. On the increase row, yo; k through the back loop on the next row.

2. K1below: k1 in the stitch below the next stitch on the left needle, then k1 in the stitch on the left needle.

3. Pick up the yarn between 2 stitches with the left needle, k through the back loop of this picked up yarn.

Mitten Recipe

Cast On and Ribbing

Using the cable cast-on method, and consulting with the chart above, cast on the number of stitches you are using onto 3 or 4 dp needles. My favorite method is to divide up the number of stitches you are using into 3 or 4 needles. On needle 1, cast on the number of stitches you intend plus 2 additional st, then move the last 2 st to the next dp needle and continue your cast on.

Join in the round, being careful not to twist. Hint, for a good, snug join, you can either:

1. Cast on an extra stitch and then k this last st tog with the first st on the first needle, or

2. Carefully move your last st to the first needle, and the first st to the last needle (crossing the two); continue with these st as usual.

Begin k2p2 ribbing (or whatever rib pattern you like); continue for at least 3.5 inches. Pull the yarn firmly as you move from needle to needle. Finish at the end of a round, indicated by the presence of the tail of your cast on yarn.

Begin Hand; Increase Round

Next round, k, increasing 4 st evenly spaced around. Continue in st st (knit plain without increasing) 3 more rounds.

Increase for Thumb, also called Thumb Gusset

Round 1: k3, pm, m1, k2, m1, pm, knit around (4 st between markers).

Round 2: k

Repeat rounds 1 and 2, increasing 1 st after the first marker and 1 st before the second marker on odd-numbered rows until you have the desired number of thumb st between markers.

K one additional round after the last increase round.

Next round, k3, place st between markers on a safety pin, piece of waste yarn, or st holder. Cast on 2 (using backward loop method), continue around.

Continue to k all rounds until you are about 1” from the desired top of mitt, or the established mitt is slightly above your pinky finger.

Shape Top of Mitten

Check the number of stitches and make adjustments if needed. You will need to have a multiple of 7 stitches. Increase or decrease if needed, and k one more round plain. Then begin shaping rounds:

Shaping Round 1: *k5 k2tog* around.

Round 2: k

Round 3: *k4 k2tog* around.

Round 4: k

Round 5: *k3 k2tog* around.

Round 6: k

Round 7: *k2 k2tog* around.

Round 8: k

Round 9: *k1 k2tog* around.

Round 10: k

Round 11: k2 tog around.

Break yarn, thread yarn through remaining st, pull tight and fasten off. Pull yarn to the wrong side and weave in.

Thumb

Pick up st from holder or waste yarn onto 2 dp needles. Using a 3rd dp needle, pick up and 4 st from the thumb opening: 2 from cast on st, 1 on each side. Move stitches around so that you can k2tog on each side of the thumb opening: k 1 st from holder together with 1 picked up st on each side. The beginning of your round will be the right side of the st that have been on the holder. Your stitch count will be the thumb st from the chart above plus 2. K around 12-15 rows or so.

Next rounds:

1. K1 k2tog

2. K

3. K2 together around.

Break yarn, thread yarn through remaining st, pull tight and fasten off. Pull yarn to the wrong side and weave in.

Hint, if you find that you have annoying holes or spaces at the thumb join, you can turn the mitt to the wrong side, thread a needle with a short amount of yarn, take several stitches around the hole, pull up the yarn and tie the ends together.

When you have done this pattern a couple of times, you can go crazy with variations! Use your favorite color work pattern, make stripes, use k and p patterns, have fun!

© 2011 Jennifer Thompson Miller, M.A.

Please consider mittens for charity!

Jennifer@dizzylettuce.com

512 740 3748

Monday, July 13, 2009

Fountain Pen Shawl

This is a detail of the Fountain Pen Shawl, from Interweave Knits. The yarn is Cascade Alpaca Lace. Gorgeous. This will be quite different when it is blocked out flat!!
Posted by Picasa

Monday, June 29, 2009

haircut!


Today, June 29, I cut my hair after 10 years of long, longer, long. The haircutter started by cutting off 8 inches & worked from there. It's really short! but most importantly - it's really cool! I have been so hot with all that hair I couldn't stand it any longer!

Here I am at the LYS, Gauge Knits in Austin.

BSJs


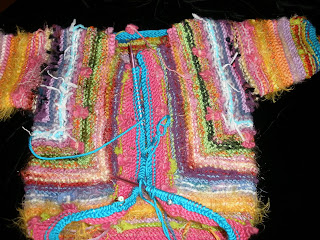
I am on my 4th or 5th Baby Surprise Jacket. I love them & am understanding their construction better every time. I am doing a lot of color work, which I group as "thoughts" - a thought of pink merging into an orange/yellow thought, etc. etc. This one is for Elisheba & starts out with vivid turquoise & ends up in pink & turq.

Knitting Obsession!!


Hi Friends!
I have taken up knitting again in the past year & it has exploded in my creative work. I am loving it!

I am posting here with my daily activities & knitting thoughts.

Here I am with my wife at a local charity event a couple of weeks ago!!